Marina Costume
ARTEFACT MAKING
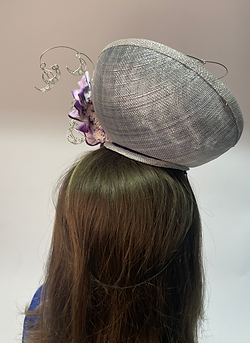
While making my skills passport artefact I used a range of millinery techniques, dyeing, wire work and fabric manipulation.


To start of the project I needed to decide in what order I wanted the three layers of sinamay to be. I bought navy and silver sinamay as I thought a combination of these could help represent the starry night sky. I ended up choosing to have the silver at the bottom and then the two layers of navy on top because in my design you can see underneath the hat when the edge turns up and I wanted that to be like revealing the silver stars of the night sky.

I started off by making the bowl shape first. As this shape was then going to be turned upside down, I had to draft the sinamay in the opposite order with navy first. I then used the same block to draft a smaller headpiece which would then be the base for the hat to sit on. The smaller piece was drafted with silver at the bottom and navy on top. I had learnt a little bit about sinamay hats in one of the millinery sessions, but not on this scale so it was definitely a learning process. The most difficult part was making sure the sinamay went over the block smoothly all the way around. It took me a long time to get the desired shape as I didn't want any creases in my final piece. I did, however, find that when steaming the sinamay it was a lot easier to smooth it out so even if it wasn't perfectly pinned when dry, I still got the desired shape once steamed. Once I had steamed all three layers I used stiffener in order to secure the shape and left it to dry.
After stiffening both pieces, I went back to the bowl shaped piece and steamed it again to add a bit of a curve to the bottom so that it would sit better on my smaller, base piece. While letting the new shape set, I added wire to the top of both pieces in order to help them keep their shape. I found this part very fiddly and difficult because I hand stitched the wire to both pieces so that it sat more accurately, but this did mean that I had to stitch through three layers of stiffened sinamay and then around the wire, which was quite a delicate and tricky task.


Once both of my sinamay pieces had been set and wired, I used sinamay bias binding to bind the edge of both pieces. I made the binding by cutting a strip of sinamay on the bias, folding the raw edges in and then folding it over the edge. I could then pull the sinamay in to the desired shape to curve around the edge. This was very time consuming because I hand stitched the binding onto both pieces with small stitches so you can't see how it has been attached. I had never used sinamay bias binding before but I really enjoyed using it and will aim to use it in other sinamay pieces I make because it keeps the design cohesive, it sits better than ribbon because it can be pulled into a curve and it allowed me to use up the remaining sinamay I had left in order to reduce waste.
I attached the bottom piece to the top one with four stitches. This way it was securely attached but you couldn't see the stitching at the top. I also attached elastic to the bottom piece by stitching it to the binding. The elastic would then sit at the back of the head to keep the piece on. It was a bit complicated at first to try and figure out how to attach the elastic because I couldn't get it through the eye of any needle because it was too thick. I then decided to stitch it on with thread and found that that worked well.


After finishing the base, I moved onto the wire work. I experimented with different wires at first including a cotton covered wire and a silver wire to try and get something similar to the design. However, I didn't like the outcomes, I wanted the moons to be more intricate. So, I tried making individual moon pendants. This allowed me to have much more detailed wire work. I also included a moonstone bead into every pendant to represent the Goddess of the moon. I think that the individual pendants are much more beautiful than using one wire because of the detail it allowed me to incorporate.

I attached the pendants to the main wire by adding loops into the wire that I could then loop the pendants around. I found that this worked really well and also gave the main wire a more interesting look because of all the loops.


During our print and dye sessions we were shown the shibori dyeing technique, but we never got to try to do it ourselves. So, I wanted to incorporate it into the project. My aim was to use the itajime technique. I wanted to use natural dye so, I soaked the fabric in beetroot juice. However, I found that it gave the fabric a red hue, and when I took it out it wasn't nearly as rich in colour as I would have liked. This could have been because I used pickled beetroot juice instead of pure beetroot or because I didn't soak it for long enough, or maybe this particular fabric just didn't pick it up very well. I wanted the flower to represent the red globe amaranth flower. This flower can be red or purple but for this headpiece I thought purple would match the theme of the night sky better.
Due to the beetroot juice not giving the wanted effect, I used purple fabric dye instead and found that it worked well. I was pleased with the outcome of the dye pattern and thought that it would be very interesting to incorporate into the headpiece.


I then had to figure out how to make a flower out of the dyed cotton fabric. This was difficult because the cotton is quite thick compared to the usual organza used in most millinery flowers. I tried making loops and hand stitching it into a flower like shape, but I wasn't happy with the result. So, with my next piece I decided to gather the entire strip and hand sew it straight on to the side of the hat. I found that gathering gave the frilly effect of the petals of the amaranth globe flower that I want to represent. While it doesn't exactly look like the flower itself, that was not my aim. My aim was to carry through the essence in order to represent the nature of my character of the Goddess as beautifully as possible.


Overall, I was pleased with the final outcome as I think I managed to capture the design well. It took a long time because I was learning as I went along and the whole project was a learning process. However, that also means that I have acquired some new skills that I can incorporate into future work.


